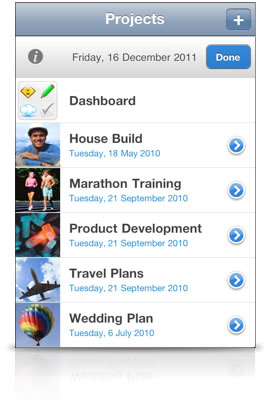
When you first open Projects, you are presented with the main screen which displays your list of projects.
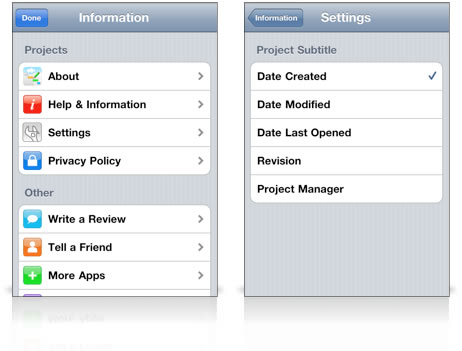
From this screen you can access menus to add and edit projects. You can also access the "Information" screen which provides Help & Settings.
The dashboard row is always displayed above the list of projects. Use this to access the project dashboard.
Each project is represented by an Image and the project Title. Below the title is a subtitle which displays additional information about the project. You can choose whether this shows the name of the Project Manager, Project Revision, or the date the project was created, modified or last opened.
To change the Project Subtitle: Select the "i" button to display the 'Information' screen, and then select Settings.
If you want to add a new Project, press the '+' button to display the option menu and select "Add New Project".
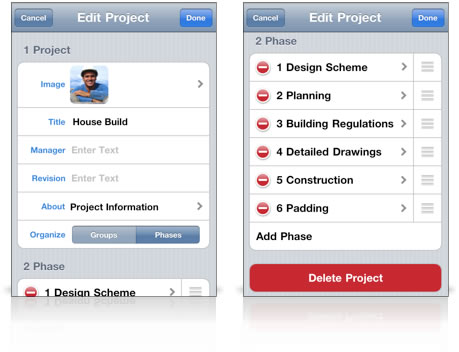
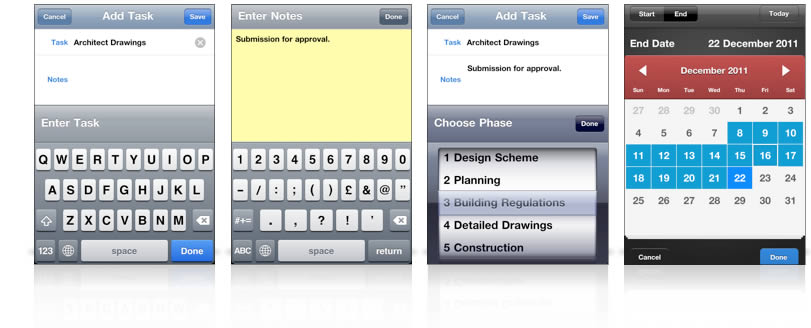
This will display the "Add Project" screen where you can enter a title for your Project and your first Group.
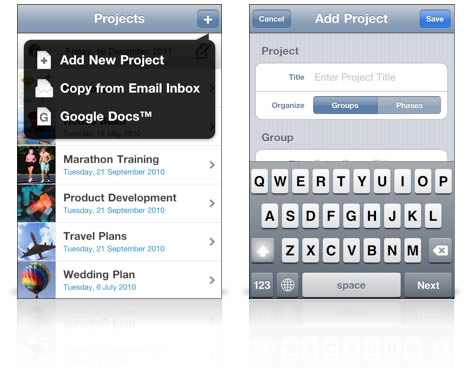
A Group is used to organize tasks within a project. You can add more groups as the size of your project increases.
You can choose whether to use the terminology "Group" or "Phase". They both operate in the same way - the only difference is terminology, so use whichever you prefer.
 If you want to edit and existing project, press the 'Edit' button to switch to Edit mode,
 then select the blue icon next to the project you wish to Edit.
Editing allows you to:
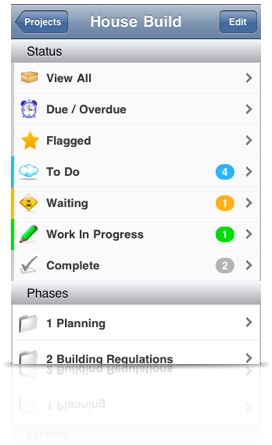
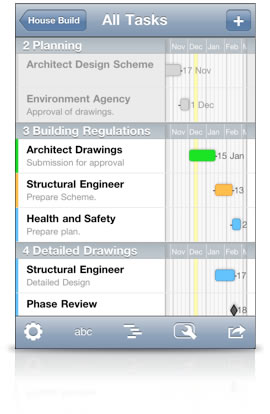
After selecting your project, you are presented with the screen which shows various filtering options to help manage your project. It also lists the Phases or Groups in your project.
Each filtering option allows you quickly see the number of tasks in your project by status. To view all task in your project, select the "View All" option. To View tasks in a particular Group (or Phase), select it from the list.
Learn more about Filtering and Search here 


If you press the "Edit" button, the display will change to the Edit mode. Editing allows you to:
![]() To add a task, press the plus button. Learn More
To add a task, press the plus button. Learn More
![]() Turn Notes on if you want additional details about a task or just leave it off if you prefer.
Turn Notes on if you want additional details about a task or just leave it off if you prefer.
![]() Tasks can be viewed in two ways. The toggle button switches between date and time plan modes.
Tasks can be viewed in two ways. The toggle button switches between date and time plan modes.
![]() To quickly make changes to multiple tasks, press the Tool button. Learn More
To quickly make changes to multiple tasks, press the Tool button. Learn More
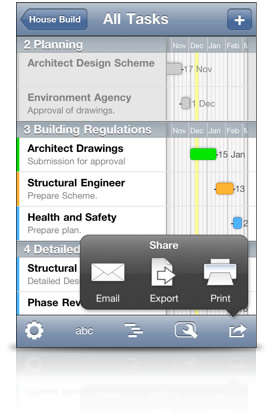
![]() To Email, Export or Print, press the Action button.
To Email, Export or Print, press the Action button.
Learn More
![]() Use Settings if you want to change the filters, sort, display or PDF/Print settings. Learn More
Use Settings if you want to change the filters, sort, display or PDF/Print settings. Learn More
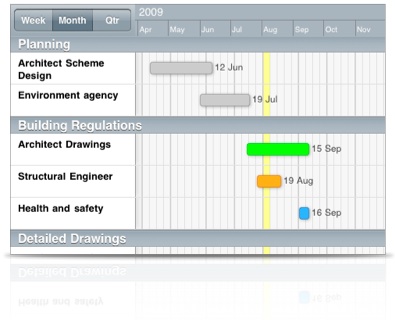
If you rotate your iPhone the view will switch to the landscape mode.
This gives you a better view of your tasks on the time plan. Drag the scale at the top if you wish to scroll the timescale to the left or right.
Tap a task to view note and Edit Task Details.
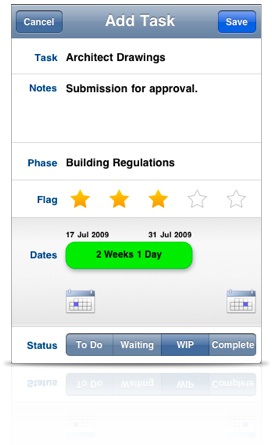
Adding new tasks is easy. Just enter the task details in the first line. Press the Save button when you are ready to add your task.
Add Notes if you like to store additional information.
Your task will automatically allocated to a Group or Phase, but you can change it if you like.
Assign a Flag of up to 5 stars. This enables you to highlight tasks of particular interest. e.g. High Priority or High Risk.
![]() Set the End Date and Task Duration by adjusting the bar with your finger.
Alternatively pick a start and end date from the calendar.
Set the End Date and Task Duration by adjusting the bar with your finger.
Alternatively pick a start and end date from the calendar.
Reduce the task duration to 1 day and you can set the task to a Milestone.
Set the Status to keep track of how a task is progressing.
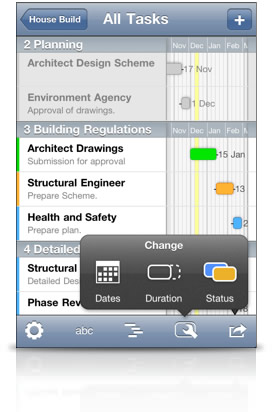
![]() When viewing your task list, Press the action button
to display task processing options.
When viewing your task list, Press the action button
to display task processing options.
Use Change Dates to change the start date or end date of multiple tasks.
Use Change Duration to set the duration or extend the duration of multiple tasks.
Use Change Status to change the status of multiple tasks.
Use Email to send Task details by HTML Email for multiple tasks.
Learn more
Use Export to create a file and send by email.
Learn more
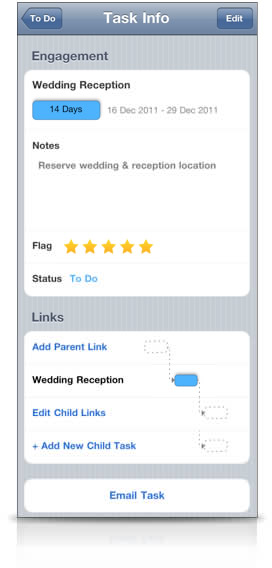
When you select a task from the task list, you are presented with the 'Task Info' screen. This provides an overview of the task.
Press the 'Edit' button to edit the task details.
If you scroll to the bottom, there is an "Email Task" option which allows you to send an HTML email with details about the selected task. This is useful when you need to send an update on a task to team members.
At the bottom of the 'Task Info' screen (you need to scroll down), you can see task links.
Task linking allow you to connect two or more tasks together in a Parent-Child Relationship. The Start Date of the Child Task is linked to the End Date of the Parent Task. Changes made to the End date of the Parent Task automatically update the Start Date of the Child Task.
Several options are available:
When a task is linked, you can select the parent or child to navigate to the parent or child task. The selected task will then become the current task and the view will update.